
While Mailchimp offers its own set of analytics, integrating Google Analytics into your Mailchimp campaigns can offer more robust insights. This blog post will guide you through the process of adding Google Analytics to your Mailchimp campaigns.
Let's dive in!
- Set Up Google Analytics
- Enable Google Analytics Tracking in Mailchimp
- Send Your Campaign and Monitor Performance
- Final Thoughts
Before we dig in I want to show you something. I promise it's worth it...
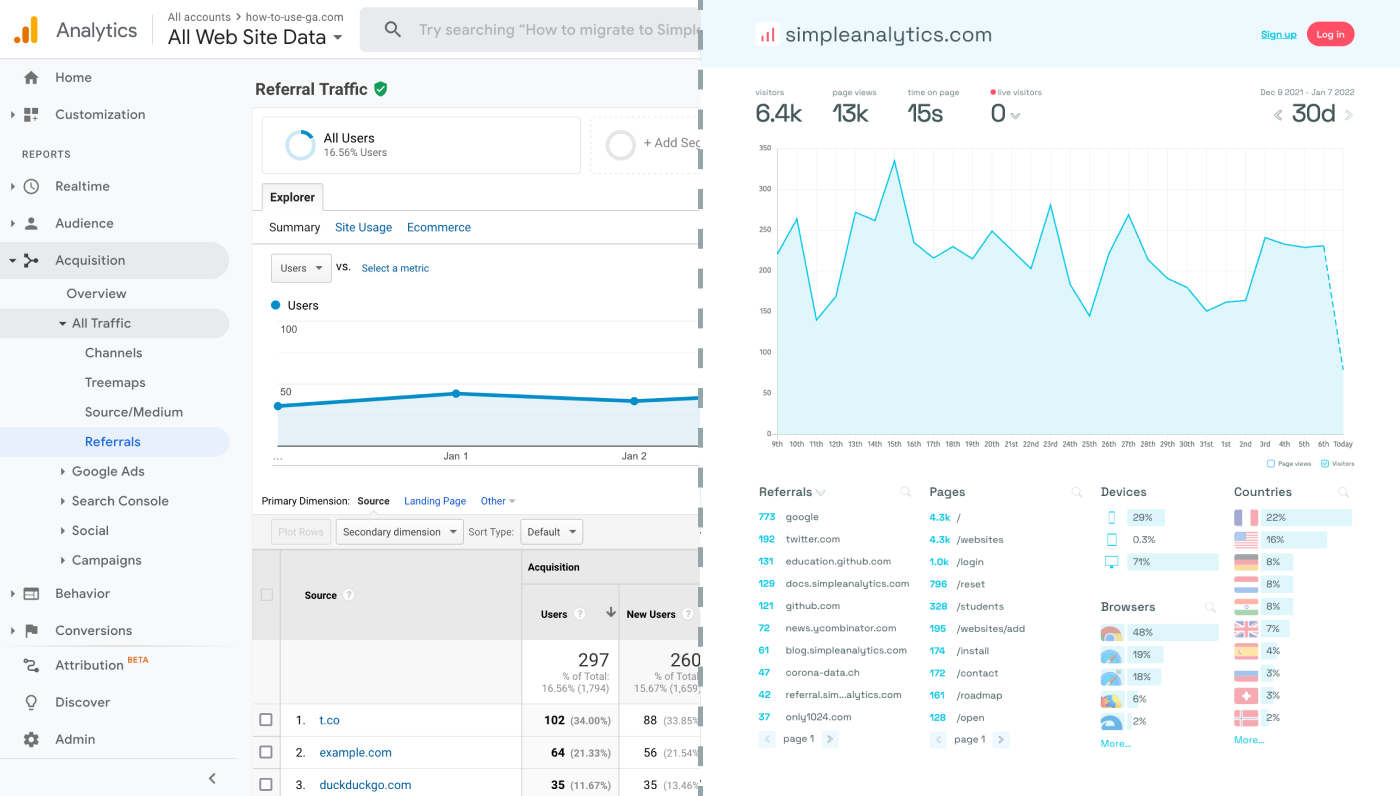
Google Analytics is great, but also complex and a bit clunky. If you just want a straightforward dashboard with the insights you need, GA is not a great place to start. Additionally, Google doesn't care about privacy and GA requires an annoying cookie banner.
That's why I built Simple Analytics, a privacy-friendly and simple analytics tool - no personal data, no cookies, just the insights you need in a straightforward dashboard.
Here is how it looks vs GA. Feel free to check our live analytics to get an idea for your project. (It is free btw)
All right, enough about us. Now let's get into answering your question!
Set Up Google Analytics
If you haven't already set up a Google Analytics account for your website, you'll need to do that first. Here’s a quick setup guide:
- Create a Google Analytics Account: Visit the Google Analytics website and sign in with your Google account. If you don’t have one, you’ll need to create it.
- Set Up a New Property: Follow the on-screen instructions to create a new GA4 property, choosing "Web" as your platform.
- Obtain Your Measurement ID: Once your property is configured, you will be given a Measurement ID (formatted as "G-XXXXXXXXXX"). Note this ID down, as it's necessary for integrating GA with your Mailchimp campaigns.
Enable Google Analytics Tracking in Mailchimp
Mailchimp simplifies the process of adding Google Analytics tracking to your email campaigns. Here’s how to enable GA tracking:
- Navigate to Campaign Settings: When creating or editing a campaign in Mailchimp, look for the settings or analytics options, which might be under a section labeled "Settings & Tracking" or similar.
- Enable Google Analytics: Find the option to enable Google Analytics tracking and enter your website’s domain. Mailchimp will automatically append UTM parameters to links in your email campaign, facilitating GA tracking.
- Customize UTM Parameters (Optional): Mailchimp allows you to customize UTM parameters for more detailed tracking. Adjust the campaign source, medium, and name so that GA can collect fine-grained data.
Send Your Campaign and Monitor Performance
After setting up Google Analytics tracking in your Mailchimp campaign:
- Complete and Send Your Campaign: Finish designing your email and send it out to your subscriber list.
- Access Google Analytics: Log into your GA account to start monitoring the performance of your campaign. Navigate to the "Acquisition" section, then "Campaigns," and select "All Campaigns" to view detailed data.
Final Thoughts
Adding Google Analytics to your campaign can give you great insights. However, ask yourself: is Google Analytics the right tool for you?
GA is an overpowered solution for straightforward analytics. If you're looking for a simple and intuitive dashboard with the insights you need, there are better alternatives. Yes, I’m talking about my own product (Simple Analytics), but there are others out there as well.
I hated using Google Analytics for my projects. It's clunky, there are hundreds of dashboards and it doesn't look appealing. Also Google doesn't care about privacy or ethics. That's why I decided to build my own and more intuitive web analytics tool.
If this resonates with you, feel free to give Simple Analytics a spin. You just need to add the script and off you go. This takes about one minute- and there is a free version as well!
Enjoy!